GHUnitの環境構築方法です。
環境:Xcode4.3.2
STEP1. プロジェクトの作成
適当にTestGHUnitというプロジェクトを作ります。
STEP2. GHUnitの取得
2つの方法があります。git使っている人や男気があるひとは後者を使うといいと思います。
方法その1.
ビルドされてるのをそのまんまつかう。
https://github.com/gabriel/gh-unit/downloads からGHUnitIOS ***.zipをダウンロードしてくる。(上のほうの新しいやつのほうがいいと思います. 0.5.2で確認)
解凍するとGHUnitIOS.frameworkというフォルダができているので
プロジェクト内のフォルダに保存。
ここではTestGHUnitの下にFrameworksというフォルダを作成してその中に入れておきます。
TestGHUnit/Frameworks/GHUnitIOS.framework
方法その2.
githubからソースコードをとってきて、自らビルドする。
メリットとしてはgitですぐに最新版にアップデートできる点。
$ cd TestGHUnit/
$ ls
TestGHUnit TestGHUnit.xcodeproj TestGHUnitTests
$ mkdir Frameworks
$ cd Frameworks
$ git submodule add https://github.com/gabriel/gh-unit.git
Cloning into gh-unit...
remote: Counting objects: 7028, done.
remote: Compressing objects: 100% (2426/2426), done.
remote: Total 7028 (delta 4687), reused 6667 (delta 4360)
Receiving objects: 100% (7028/7028), 39.60 MiB | 268 KiB/s, done.
Resolving deltas: 100% (4687/4687), done.
$ cd gh-unit/Project-iOS
makeします
$ make
makeしたら以下のようなエラーがでる場合があります。
Error: No developer directory found at /Developer. Run /usr/bin/xcode-select to update the developer directory path.
Xcode4.3からXcodeのパスが変わっているためxcode-selectで/Developerのほうを見に行ってミスっている
$ sudo xcode-select -switch /Applications/Xcode.app/Contents/Developer
iOSでGHUnitでテストする【環境構築】
で治る
STEP3. ビルドセッティング
まずテスト用のターゲットを追加します。
プロジェクトセッティング画面を開いて左下のAddTargetボタンを押し、EmptyApplicationを選びます。
ProjectNameを適当にUnitTestなどとします。
Use Core Dataや Include Unit Tests などにはチェックいりません。
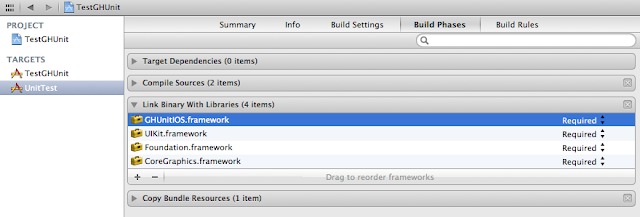
次にTARGETSのな家から作成したUnitTestを選択し、BuildPhasesの画面を出します。
Link Binary With Librariesのセクションを開き下の+ボタンを押してフレームワークを追加します。
下のAdd Otherを選択します。
ビルドしたものをダウンロードした場合はTestGHUnit/Frameworks/GHUnitIOS.frameworkのフォルダを選択してOpenを押す。
自前でビルドした場合は、gh-unit/Project-iOS/build/Framework/GHUnitIOS.frameworkを選択。
そうするとこうなるはず。
もしも別の表記になっていたり、アイコンが違ったりしたら - ボタンを押して一回消してから上のをやり直すと治ったりします。
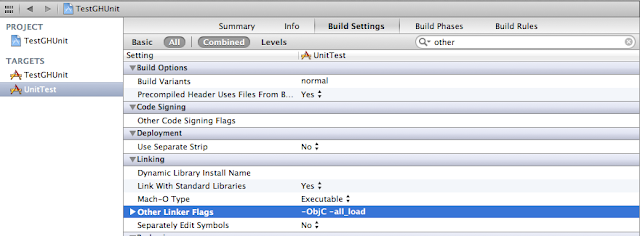
次にBuild Settingを開き、Other Linker Flagに -ObjC -all_load を追加します。
これでテストを書けば動く状態になっているはずです。
STEP4. テスト
UnitTestのフォルダ内のAppDelegate.h(ここではYYAppDelegate.h)を消します。
そしてYYAppDelegate.m を以下のように変更
#import GHUnit.h>< div>
@interface MyTest : GHTestCase {
}
@end
@implementation MyTest
- (void)testStrings {
NSString *string1 = @"a string";
GHTestLog(@"I can log to the GHUnit test console: %@", string1);
// Assert string1 is not NULL, with no custom error description
GHAssertNotNULL(string1, nil);
// Assert equal objects, add custom error description
NSString *string2 = @"a string";
GHAssertEqualObjects(string1, string2, @"A custom error message. string1 should be equal to: %@.", string2);
GHAssertEquals(1, 1, @"test");
}
- (void)testNums {
GHAssertEquals(1, 2, @"test");
}
@end
main.m を以下のように修正


